
 |
| ECY12 'Old Newark Beer' Yeast Takes Center Stage |
 |
| I Split The Bottle Of ECY12 Into Three Empty Yeast Tubes |
 |
| 1954 Yankees Champ Ballantine Beer Display |
So I put back the tube of WLP001 and put the ECY12 in my bag instead, this brew day was starting to get interesting. Maybe it's the nostalgia, or the rave reviews that Al's yeast has been getting in the New Jersey brewing community but I had some and was soon going to use it to make beer. If the ECY12 was good enough for Mel Allen, Red Barber and the Yankees it was certainly good for my latest beer.
 |
| Brewdays Start With Coffee And qBrew |
 |
| 11 Pounds Of Grain In Preheated 5 Gallon Mash Tun |
The mash temperature was 159F initially and after a bit a stirring to make sure the mash was free of clumps and hot spots it settled in at 158F. I make sure I hit my target mash temperature within a minute or two of pouring in the grain to avoid denaturing the mash.
 |
| 159F Initial Mash Temperature |
 |
| Initial Gravity 1.084 Corrected At 60F |
 |
| Boil Pot With 4.5 Gallons Of Wort |
I pitched ECY12 - Old Newark Beer™ directly into the 60F wort right after aerating it really well. I soaked the bottles and tubes in One-Step™ as an extra precaution against infection.
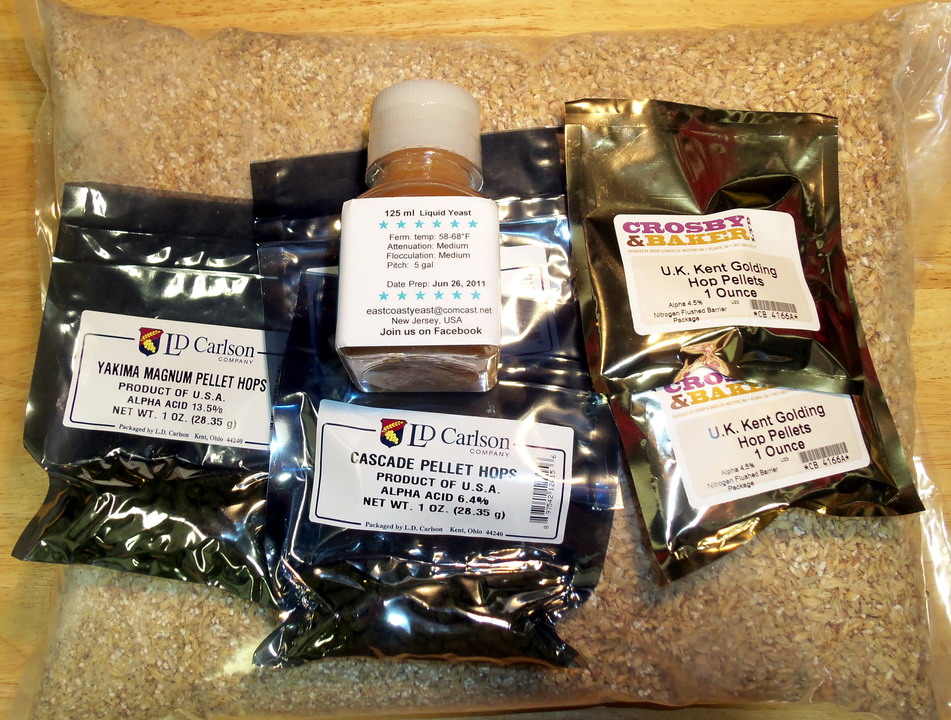
Recipe:
Click to download this recipe file for qBrew 10.0 pounds US 2 Row
1.0 pound Crystal 20L
1 ounce Yakima Magnum (pellets)
2 ounces Kent Golding (UK) (pellets)
2 ounces Cascade (pellets)
125 ml East Coast Yeast ECY12 - Old Newark Beer™ at 53-68° F
Raise to 68° F over 2 days then rack to secondary fermenter
Cold condition secondary fermenter for 3-4 weeks at 36° F
Keg at 30 psi for 2-3 days and serve at 36° F
Mash at 158° F for 60 minutes.
Boil for 60 minutes.
Ferment at 64-66° F.
Since I use the Mr. Beer fermenters and they hold around 2.5 gallons of wort I can use half of the yeast that's packaged for 5 gallon brews and still get a high cell count. I see this as another low risk way to save money on ingredients while maintaining quality.
Click to download Screwy's latest qBrew database
Click to download Screwy's latest qBrew database
Directions:
Infusion Mash: (Soak mash tun in 8 quarts of 170° F water for 20 minutes to pre heat it)
Heat 21 quarts of filtered water to 170° F
Pour 14 quarts of 170° F water into mash tun
Mix in 11.0 pounds of crushed grain mix at 68° F
Pour the remaining 170° F water to fill mash tun to 4.50 gallon mark
Stir water and grain mixture and adjust to 158° F and mash for 60 minutes
Fly sparge with 168° F strike water to set mash bed to 168° F
Lauter for 30 minutes adding 18.5 quarts of sweet wort to 20 quart pot
Full Wort Boil:
Add 1 ounce Magnum hops with 60 minutes remaining to boil
Add 2 ounces Kent Goldings (U.K.) hops with 20 minutes minutes remaining to boil
Add 1/4 tablet WhirlFloc with 9 minutes remaining to boil
Add 1 ounce Cascade hops with 7 minutes remaining to boil
(Optional) 1 ounce Cascade hops dry hop 1 week in secondary before bottling
Use wort chiller to cool wort to 60° F
Primary Fermentation:
Use autosiphon to prevent excess hop and grain debris from getting into fermenter
Fill the Mr. Beer fermenter with wort to just above the 8.5 quart mark
Aerate wort and pitch 45 ml of East Coast Yeast ECY12 - Old Newark Beer™ at 60° F
Ferment to final gravity, raise to 68° F over 2 days
Secondary Fermentation:
Cold condition secondary fermenter for 3-4 weeks at 36°F
Keg/Bottle:
Keg and force carbonate at 30 psi for 2-3 days at 34°F
Bottle prime and carbonate at 68° for 14 to 21 days
 |
| Wort Aerated And Pitched At 60F |
After getting the wort and yeast to an even 60F I aerated the wort really good using a long handled spoon until it was nice and frothy. I pitched the liquid yeast in and whipped it up really good again before screwing on the top of the fermenter, wiping down the outside and putting it in my fermentation chamber where I could better control the temperature once fermentation took off.
 |
| OG Reading 1.059 A Point Lower Than qBrew Calculated |
The original gravity reading, taken after adding some filtered make up water to bring the volume up to 2.25 gallons, was 1.059 or just about a point short of the qBrew calculation. It's important to get your brewing process and equipment dialed in and then keep good records of volumes, timings and temperatures. I've done it from the start and now I can hit my target gravities everytime based on mash thickness, time and temperature.
 |
| A Peek Inside After 12 Hours At 62F |
After 12 hours of fermentation I took a peak to see what was going on inside the fermentation chamber. There was a nice layer of trub at the bottom of each fermenter and just the slightest amount of krausen had begun to form. I knew from reading that during this inception phase of the fermentation the yeast cells were busy multiplying like little Viagra crazed bunnies and in a short while the primary fermentation would be in full swing.
 |
| A Peak Inside After 24 Hours At 62F |
Another peek inside my chamber 12 hours later proved my initial observations were correct, the fermentation had clearly taken off now. I'll gradually let the temperature rise up to the 64-66F range over the next several days. I hadn't planned on brewing a lager beer this weekend but as luck would have it I had everything needed to do just that. Some great new yeast, some American 2 Row malt to try out for the first time and my trusty fermentation chamber.
 |
| Screwy's SPA Recipe #57b |
I guess I'll just sit back, relax and have a home brew......
After 3 weeks of fermentation, which was the same day I returned home from my trip to Alaska, I racked the pale ale to sanitized secondaries and added in some Cascade hops to enhance the aroma. This coming weekend I plan on adding some priming sugar solution to the corny kegs when I fill them to allow the beer to naturally carbonate. I did this the last time and after 2 weeks at 68-70F all that was needed was to hook up the corny kegs to enough Co2 to to serve up a perfect pour.
After 3 weeks of fermentation, which was the same day I returned home from my trip to Alaska, I racked the pale ale to sanitized secondaries and added in some Cascade hops to enhance the aroma. This coming weekend I plan on adding some priming sugar solution to the corny kegs when I fill them to allow the beer to naturally carbonate. I did this the last time and after 2 weeks at 68-70F all that was needed was to hook up the corny kegs to enough Co2 to to serve up a perfect pour.
 |
| Sample Taken Before Racking To Secondary |
The 2 Row malt hand the ECY12 fermented the pale ale down 2 points lower than my initial qBrew calculations, this is a very good thing. The initial samples I drank tasted very clean and the beer fermented out to a clear golden and very appealing golden color. I decided to add some Cascade hops to the secondary so after a week I'll be bottling and kegging this batch up and thinking about how good they're going to taste.
I added a priming sugar solution of 5 tablespoons pure cane sugar and boiled water to my 2.5 gallon corny kegs and racked the finished beer into them. I then sealed and purged the kegs with 15psi of Co2 and set them off in a corner of the basement to naturally carbonate. After 12-14 days I moved one of the kegs into my refrigerator and the next day I tapped the keg to give it a taste.
I really liked what I tasted too. The natural carbonation was soft and pleasing allowing the finishing hops to come through, this is definitely a winner in my book. I've forced carbonated several beers and I'm absolutely sure there is a huge difference between those beers and the beers I've taken the time to let naturally carbonate.
 |
| Final Gravity Hit 2 Points Lower Than Expected |
 |
| Screwy Pale Ale - SPA |
Hey SB,
ReplyDeleteTo give my retired father a new hobby, I got him a Mr. Beer kit and subsequently (partly due to seeing your set up) a 2nd Mr. Beer fermentation tank.
His 2 major interests are golf and beer. Age and health reasons are keeping him from golfing as much as he'd like and brewing seems a natural diversion.
Wondering what you would suggest experiment-wise to help him discover the subtle differences in brewing techniques/methods.
I bought a house that now has 12th generation hops growing in the yard - Willemette, Cascade and Centennial. In fact, I've dried and stored a few harvests, and wondering how to incorporate them into his recipes.
His unused shower maintains 70 in summer and 50 in winters.
He's prefers the Heine's, St. Pauli's, Grolsch's. I've read enough to know not to attempt those til the right season, but wondering how we can "test" certain elements to ultimately learn secrets/techniques/etc to brew the type of beer he enjoys.
Are there Ales/wheats/etc that we can brew now that will give us experience with ingredients/methods that will help us successfully brew the kind of beers he already prefers?
If you had a dad with 2 Mr. Beer kegs, how would you fan the home brewing flame?
First of all welcome to the Obsession. I'd start your Dad out with some simple extract kits, like those from Mr. Beer, to get him brewing at first.
ReplyDeleteFrom those He'll learn the importance of sanitization, temperature control and the basics of the brewing process.
Next steps would include getting 2 pounds of dry malt extract, some Nottingham yeast and boiling some of the nice homegrown hops in varying amounts to see how they can change the flavor, aroma and bitterness of the beer.
If your dad has access to the Internet help him join one of the homebrew forums where other experienced brewers share their knowledge, they are a great place to learn a lot about homebrewing.