Wednesday, September 21, 2011

Screwys Recipe #61 - Screwy Pale Ale (All Grain)

I bottled up and kegged my latest batches on Friday, they were extract/steeping recipes I brewed two weeks ago to give my pipeline a quick boost. Now with the cooler weather and all day Sunday to myself I decided to brew another batch of my Screwy Pale Ale. I really wanted to get a hold of some East Coast Yeast ECY-10 or ECY-12 but Al's on vacation now and it didn't make it in his last delivery to Princeton Homebrew. So early Sunday morning I fired up the coffee pot, qBrew and starting entering my recipe's ingredient list and about 20 minutes later my recipe was done. It's basically a remake of my American IPA style using 2 Row malt, some Crystal 10L and Columbus, Centennial and Cascade hops.

Screwy Pale Ale Ingredients
I emailed my ingredient list to Joe Bair and headed over to Princeton Homebrew around lunchtime to pick them up. Luckily Joe had extra help on and my order was ready and waiting. Somedays it can get really crazy busy there and I may have to wait a bit to get the entire order put together but it never takes too long. Joe told me he would let Al Buck know I'd like to get some of his ECY-10 or ECY-12 the next time he dropped off a new supply of yeast. For this recipe I would be using Safale US-05 dry yeast again. I read on some websites where fellow brewers said the Safale US-05 is the dry form of WLP001 California Ale yeast, which Joe was out of this weekend.

A Low 152F Mash Temperature For A Drier Beer
The last batch of SPA I made last month is pretty close to the best all grain summer recipe I've made this year. I've been using 2 Row and a bit of Crystal malt in both recipes but this time I'm mashing at 152F instead of 158F to try and give the finished beer a little bit dryer finish this time. Both the ECY-12 and the Safale US-05 are medium flocculators so the there should be little if any difference in how the beer ferments but of course the final gravity readings will tell me that for sure.

I Recirculated The Wort For a Full 10 Minutes This Time
 After mashing at 152F for 60 minutes I began to recirculate the wort to make sure it was flowing into the sample cup nice and clear before I let it fill up my 20 quart boil pot. It's a pretty big stainless steel cup that holds close to 12 ounces of wort and I must have emptied it back into the top of the mash tun at least 10 or more times before transferring the wort to my boil pot. This is the longest I've spent recirculating wort, since I wasn't feeling pressured for time, I was able to try out a few new tweaks to my brewing process.

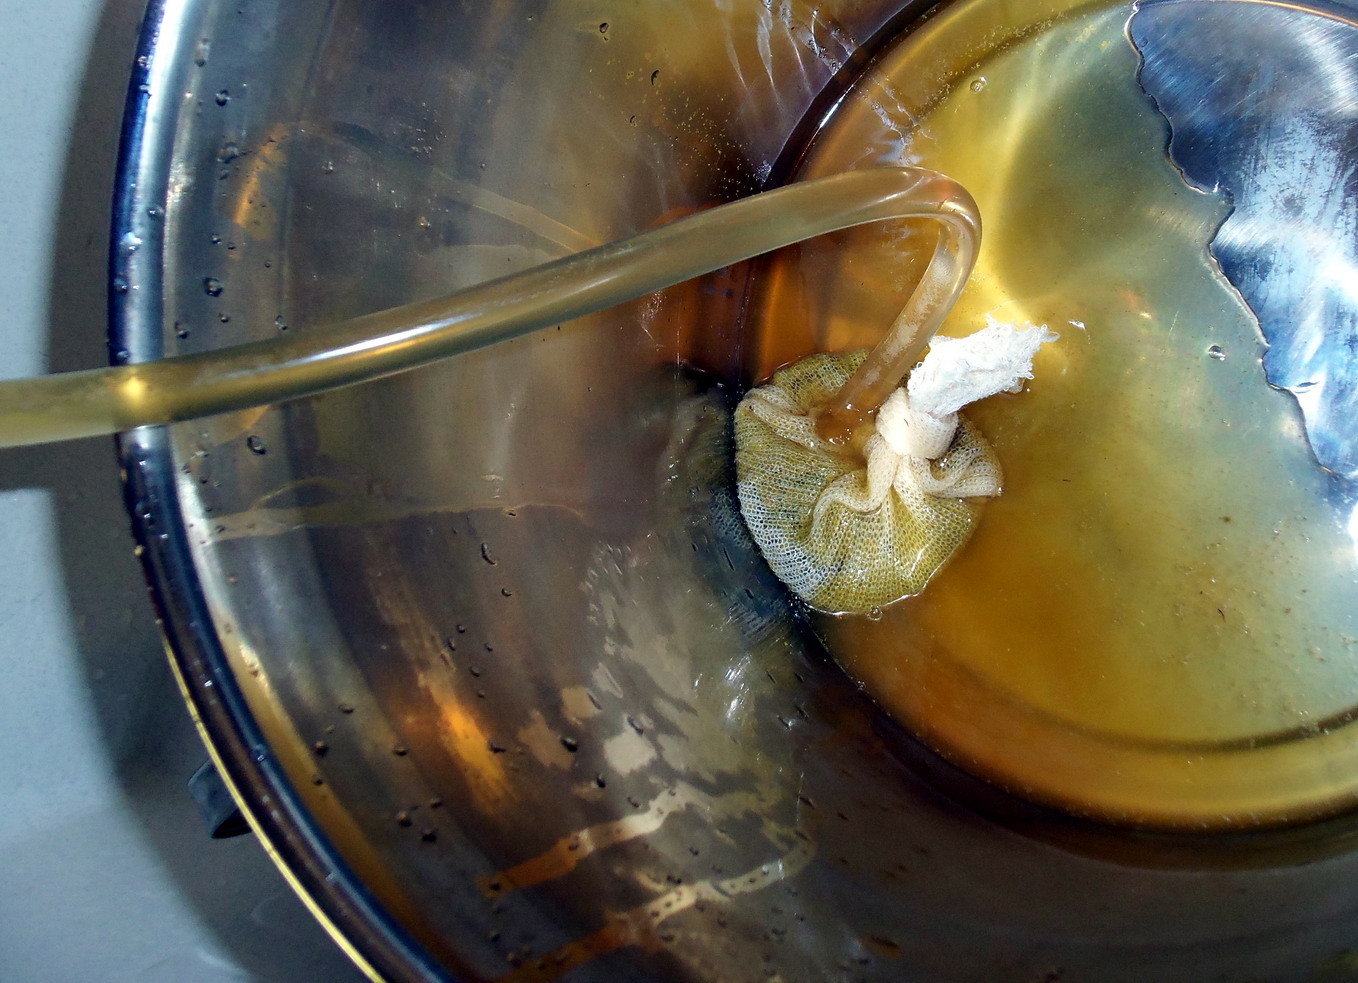
Clear Wort Flows Onto Hop Sack During First Wort Hopping
I added 1 ounce of Columbus pellet hops to the boil pot and then slowly drained the wort from the mash tun into the boil pot. I adjusted the rate of flow down until it was a bit slower than it was during the recirculation and it took slightly more than 30 minutes to fill the entire pot. During the lauter the combination of hot wort mixed with the aroma from the hops and filled the brew room and made it smell really good.

I have a window fan blowing fresh air into the brew room at one end of the brew room and an open window at the other end to exhaust the hot boil fumes and keep fresh air constantly circulating into the room. Indoor brewing allows you to brew regardless of the weather, which works out great for most folks with limited available time for brewing.

Size 5.00 gallons: Estimated IBU=65, SRM=5, OG=1.061, FG=1.015, ABV= 5.9%

I pitched rehydrated Safale US-05™ yeast into the 70F wort right after aerating it really well.

Recipe:
Click to download this recipe file for qBrew
10.5 pounds US 2 Row
 0.5 pound Crystal 10L

 1 ounce Columbus (pellets)
 1 ounce Centennial(pellets)
 1 ounce Cascade (pellets)
2 ounces Cascade (pellets) - Dry Hop 5 Days
11g Safale - US05 Rehydrate and pitch at 70° F

Aerate, pitch at 70° F and ferment at 68-72° F until final gravity is reached
Raise to 72° F over 2 days then rack to secondary fermenter
Cold condition secondary fermenter for 3-4 weeks at 36° F
Keg at 30 psi for 2-3 days and serve at 36° F
Mash at 152° F for 60 minutes.
Boil for 60 minutes.

I use Mr. Beer fermentors and they hold around 2.4 gallons of wort but I used all 11g of yeast that's typically packaged for 5 gallon brews.

  Click to download Screwy's latest qBrew database   


Directions:   
Infusion Mash: (Soak mash tun in 8 quarts of 170° F water for 20 minutes to preheat it)
Heat 21 quarts of filtered water to 165° F
Pour 14 quarts of 165° F water into mash tun
Mix in 11.0 pounds of crushed grain mix at 68° F
Pour the remaining 165° F water to fill mash tun to 4.50 gallon mark
Stir water and grain mixture and adjust to 152° F and mash for 60 minutes
Fly sparge with 168° F strike water to set mash bed to 168° F
Lauter for 30 minutes adding 18.5 quarts of sweet wort to 20 quart pot

Full Wort Boil:
Add 1 ounce Columbus hops with 60 minutes remaining to boil
Add 1 ounce Centennial hops with 20 minutes minutes remaining to boil
Add 1/4 tablet WhirlFloc with 9 minutes remaining to boil
Add 1 ounce Cascade hops with 7 minutes remaining to boil


(Optional) 2 ounces Cascade hops dry hop 5 days in secondary before bottling

Use wort chiller to cool wort to 70° F before pitching yeast.

Primary Fermentation:
Use autosiphon to prevent excess hop and grain debris from getting into fermenter
Fill the Mr. Beer fermenter with wort to just above the 8.5 quart mark
Aerate wort and pitch 11g of rehydrated Safale US-05 pitched at 70° F
Ferment to final gravity, raise to 72° F over 2 days

Secondary Fermentation:
Cold condition secondary fermenter for 3-4 weeks at 36°F

Keg/Bottle:
Keg and force carbonate at 30 psi for 2-3 days at 34°F
Bottle prime and carbonate at 68° for 14 to 21 days

20 Quart Boil Pot With Hop Addition
Once the boil took off I set the timer to 60 minutes and let the first hop addition boil away in the wort. The 2 Row seemed to create a lot of break material during the boil forming large pieces of coagulated proteins and tannins that I later left at the bottom of the pot when racking the wort to the fermentor.

I Kept Removing The Hot Break Every So Often
A fair amount of hotbreak also formed on top of the boiling wort. This foamy stuff is said to be bitter so I remove it before it gets a chance to sink to the bottom of the boil pot. Another good reason for brewing all grain when you have plenty of time is you get to think of and try out new ideas.

Rehydrated Safale US-05 Yeast Before Pitching

After adding in the last of the hop additions and WhirlFloc the boil completed and I used my wort cooler to get the temperature down to 70F for pitching. I rehydrated the yeast in boiled water cooled down to 90F. The yeast soaked for almost an hour before I was ready to pitch it into the wort and by this time it had cooled down to about 70F.

Racking From The 20 Quart Boil Pot To 2 Mr. Beer Fermentors
As I racked the wort from the boil pot to the fermentors it ran very clear and it had a nice light yellow color. I was able to fill both fermentors to just above the 'Q' mark while still leaving a lot of trub in the boil pot making this batch a full wort boil using first wort hopping.

Our City Water Supply Tastes Good But I Filter It For Brewing
The second fermentor did come up just a bit short of the top off mark so I added about two pints of filtered water directly to the fermentor until the top of the wort was just above the 'Q'. This extra bit of water dropped the original gravity of the second batch down a few points lower than I thought. This would have been a great batch to have added in a little DME to the recipe to give the original gravity a boost.

Cold Break Left Inside The Boil Pot After Racking To Both Primaries
As usual I whipped the wort up into a nice thick foam before pitching the rehydrated yeast and then whipped it up good again to make sure it was aerated really well before screwing on the lids and placing them inside the fermentation chamber. About 3 hours earlier I had put half a dozen frozen water bottles in the top shelf of the fermentation chamber which cooled it down to around 50F.

Freshly Pitched And Ready For Fermentation
I know that during the primary fermentation the yeast can raise the inside temperature of the fermentors 5-7F higher than when the yeast was first pitched. Having plenty of extra time for brewing and not feeling rushed for a change I figured I'd start them off cold and then let the yeast gradually raise the temperature inside the fermentors to 68-72F.

12 Hours Later A Nice Layer Of Krausen Already Formed

The next morning my theory proved right since both fermentors showed healthy signs of krausen and the digital thermometer read 68F. This meant the yeast had been given plenty of time to multiply and gradually raise the temperature inside the fermentors without causing any significant increase in lag time.

24 Hours Later Primary Fermentation was In Full Swing

Later that night I peeked in to see that the primary fermentation phase was in full swing. There was plenty of activity inside the fermentors and the krausen layer had grown significantly thicker in size. In my mind I had covered all three things under my direct control as a brewer for getting the best fermentation possible, which will also give me the best beer possible in the process.

Aerated Wort Whipped To A Foam Before And After Pitching

I used fresh, viable yeast and enough of it. I rehydrated the dry yeast in water according to the directions published by Fermentis. I made sure the pitching and fermentation temperatures were within the optimum range of the Safale US-05 yeast. I also took a lot of time aerating the wort before and after pitching the yeast to make sure I had gotten as much oxygen into solution as possible. And finally my recipe had the right levels of nutrients in it because it didn't include too many adjuncts, just barley malts and hops.

Removing Spent Grains From The Mash Tun
This coming Saturday I'll take my first hydrometer readings I'm pretty sure these two batches will be done fermenting in 5-7 days. Once they've reached final gravity I'll be weighing down my hops sacks adding an ounce of Cascades to each and dry hop them for 5-7 days. Right after that I'll bottle them and let them carbonate for another 7-14 days before taking some samples.

This Is What My July SPA Looked Like
This months SPA will come out lighter than July's SPA recipe because it uses only .5 pound of Crystal 10L instead of 1 pound of Crystal 20L. The Safale US-05 yeast produces a clean, crisp beer with low diacetyl and by getting it off to a rousing start there should be little ester production which set the stage for allowing the hop additions to shine. I plan to dry hop with Cascades for 5 days after it hits final gravity but the amounts will be determined after giving the beer a taste test.

Sunday, September 4, 2011

Recipe #60 - Ptarmigan Pale Ale - With A Twist

For the past month or so I haven't been able to find time to do any brewing, between the sweltering east coast heat, travel, vacations and other commitments it was nearly impossible to even consider it. But I'm happy to report that all changed yesterday. With the three day Labor Day weekend coming up I was finally able to set aside time to work in the brewhaus and brew up two of my favorite Mr. Beer recipes, with a few new twists.

Steeping 2 Pounds Of Crystal 20L In 2 Gallons Of 154F Water
 About 3 weeks ago I had ordered double recipes of both Ptarmigan Ale and Proud Papa Pilsner from the Mr. Beer website. I decided to try these recipes once again because it had been nearly a year since I'd actually brewed either of them last. This time I would include in the recipes steeping some Crystal 20L to give the finished beer a little more body and head retention. Since switching to all grain brewing I really learned to enjoy a full bodied beer with all the great lacing and head retention they produced. I knew the Ptarmigan Pale Ale and Proud Papa Pilsner extract recipes would definitely benefit by steeping some grains in them.

Both 16 Quart Boil Pots Hold 2 Mr. Beer Recipes Each
 My plan to reduce brewing time was to use 3 pots, one to hold the steeping grains and 2 more to hold the boiling wort. The larger 20 quart pot is where I steeped the Crystal 20L grains for 30 minutes or so in 154F filtered water. The two smaller 16 quart pots were filled about 2/3 with filtered water and put to the heat to start them boiling during the steep.

Once the steeping was complete I removed the grain bag letting it drain for a minute or two without squeezing it, to remove as much liquid as possible. I then poured the steeped wort evenly distributed between both 16 quart boil pots and brought them up to a rolling boil for about 60 minutes or so.

Rehydrating 4 Packets Of Safale US-05 In 90F Water
While waiting for the wort to boil I boiled a few cups of filtered water and cooled it down to 100F or so before pouring it into 4 small mason jars I had soaked in One-Step. I then emptied the 4 packets of Safale US-05 yeast, one packet each, into the jars and gave them each a gentle stir using a sanitized plastic fork. I had by now already tossed 4 packets of Mr. Beer fromunda yeast into both boil pots to act as nutrients for the Safale US-05. I figured this along with rehydrating the dry yeast before pitching it and by pitching an entire packet of yeast, double the amount needed for a Mr. Beer sized batch, I would have a strong fermentation with as little lag time as possible.

Rehydrated Yeast Cream After 45 Minutes
 As I got my racking cane, wort chiller and fermentors sanitized and ready for use I would from time to time give the yeast in each of the mason jars a few gentle stirs. When you first pour the dry yeast into the water it will tend to clump up pretty bad. But as the water starts soaking through the yeast's cell walls the clumps are eliminated and the mixture now takes on a creamy texture. Since the dry yeast is packaged with a bit of food for the cells you can expect to see a small amount of krausen develop in each of the jars too.

Pitching Rehydrated Yeast Into Well Areated 70F Wort
The small mason jars are easy to work with, they pour nicely into the fermentor and they don't tend to slip out of your wet hands. They're easy to fit in a small pot when sanitizing and the gaskets under the lids work well to keep out and dust and bugs. I've already added them to my brewing process so no more fumbling around using small cereal bowls and plastic wrap to rehydrate the yeast in.

Size 5.00 gallons: Estimated IBU=36, SRM=15, OG=1.056, FG=1.014, ABV= 5.4%

I rehydrated and then pitched Safale US-05 Dry ale yeast directly into the 70F wort right after aerating it really well. I soaked the mason jars in One-Step™ as a precaution against infection.

Recipe:
Click to download the Ptarmigan Pale Ale recipe file for qBrew
1.0 pound Crystal 20L
4.0 cans Mr. Beer High Country Canadian Draft (HME)
2.0 cans Mr. Beer Pale Export UME

1.0 ounce Amarillo @ 7 Minutes (pellets)
1.5 ounce Cascade dry hop for 5-7 days (pellet)

11.5 g Fermentis Safale US-05™ Dry Yeast at 68°-72° F

Aerate, pitch at 70° F and ferment at 65-70° F until final gravity is reached

Raise to 74° F over 2 days then rack to secondary fermentor
Dry hop for 5 to 7 days at 70° F
Cold condition secondary fermentor for 1 week at 36° F
Keg prime with 5 teaspoons of pure cane sugar per 2.25 gallons for 14 days @ 70° F
or...
Keg at 30 psi for 2-3 days and serve at 36° F


  Click to download Screwy's latest qBrew database   


Directions:   
Steep: 1 pound of Crystal 20L in 8 quarts of filtered water at 154° F water for 30 minutes
Pour the wort into a 16 quart boil pot
Top off the boil pot with boiling filtered water
Full Wort Boil: 
Boil for 60 minutes total
Add 1 ounce of Amarillo hops with 7 minutes remaining to boil
Add boiling water to boil pot as needed to keep it topped off

After a 60 minute boil remove the heat source and stir in Mr. Beer extracts
Use wort chiller to cool wort to 70° F before pitching yeast

Primary Fermentation:
Use auto siphon to prevent excess hop and grain debris from getting into fermentor
Fill the Mr. Beer fermentor with wort to the 'Q' above the 8.5 quart mark
Aerate wort thoroughly by whisking it for a couple of minutes
Pitch 11g of rehydrated Safale US-05 Ale yeast at 70° F
Aerate the wort again for several minutes to get as much oxygen into as possible
Ferment to final gravity at 68° F, raise to 74° F over 2 days

Secondary Fermentation:
Rack to sanitized secondary at 70° F
Dry hop with 1.5 ounces of Cascade hops for 5 to 7 days
Cold crash for a week before bottling or kegging.


Screwy's Cooler Dropped The Wort Temperature To 70° F In 20 Minutes

The entire 'hotside' brewing process completed as planned and there was plenty of wort in the boil pot to almost completely fill both Mr. Beer fermentors. After using my wort cooler and the wort now at 70° F it was time to rack it off into the little brown kegs. Previously, while the wort was boiling away, I had sanitized all the fermentors and racking gear that I would be using during the brewday.

It didn't take very long to do because I always clean out the fermentors and give them a soak in OxyClean FREE right after every use. This way when I go to use them the next time all that's needed is to take apart the spigot assemblies and lids and soak them in One-Step™, then screw in the spigots and fill the fermentors half way with One-Step™ and let them soak for 10-20 minutes before use.
 
A Single Boil Pot Fills Two Mr. Beer Fermentors
The racking cane makes transferring the wort from the boil pot to both Mr. Beer fermentors really easy to do. It also prevents spilling any wort during the process helps keep cleanup to a minimum. If you're still lifting the boil pot and pouring wort from it into the tops of the LBKs then you should seriously consider buying a racking cane. They're inexpensive, easy to maintain and fun to use.

Ptarmigan Pale Ale Original Gravity Read 1.048
 The hydrometer reading I took just before I placed the fermentors in the fermentation chamber read 1.048 which was about 8 points lower than the qBrew calculations. This was expected since the Mr. Beer extract numbers have been found to be a bit overstated to start with. If each can of HME/UME was off by only a single point the OG reading of the finished wort would be off by 6 points or a point per can.

Screwy's Fermentation Chamber And Frozen Water Bottles

I had put a half dozen or so frozen water bottles in the fermentation chamber to bring the inside temperature down lower before placing the now filled and pitched fermentors in it. I know that the temperature of the fermenting beer will go up during the first day or so and this is why I keep them cooled off a bit during that time. I planned to ferment this batch at 68-70° F until they reach final gravity, so I'll only need to replace the frozen water bottles for the first day or two in order to hold the temperature between 66-68° F. This temperature in my basement brewing area is a constant 68-70° F this time of year so it'll be perfect for fermenting this entire batch.

Four Mr. Beer Sized Batches Fermenting Away
I'm fortunate enough to have built Screwy's Fermentation Chamber last year when I decided to brew up my series of Spinning Monk Lager beers. Since then I've also used it for maintaining fermentation temperatures of my Ales as well as Lagers. It's very well insulated so just a few frozen water bottles are needed to keep the temperature lower as needed. I tape the probe of my digital thermometer directly to the outside of the Mr. Beer keg so the readout shows the temperature of the beer.

Thick Layers Of Krauzen Form After 12 Hours
I always look forward to taking that first peek inside the fermentation chamber to see how well the fermentations have taken off. I like to wait at least 12 hours before taking my fist peek. I was pleased to see that all four fermenters showed signs of very active fermentation, which is exactly what I had hoped to see. Pitching fresh, viable yeast at the proper temperatures is the key to getting your fermentations off to a great start. The sooner the population of good yeast cells multiplies themselves to the point of being the dominant microorganism in town that better the beer will turn out.

All Four Kegs Show Active Fermentation After 36 Hours
Well it's now all over except for the wait. By the end of this week I'll take my first final gravity readings and toss a sanitized muslin sack filled with hops into each fermentor and let them soak for another 5 to days. Then I'll take more final gravity reading to see when this batch is ready for bottling and kegging. I will be using pure cane sugar to naturally carbonate both the 12 ounce bottles and the 2.5 gallon corny kegs again this time. That's my plan and I'm sticking to it.

The Proud Papa Pilsner recipe followed basically the same exact brewing steps as did the Ptarmigan Pale Ale recipe except of course it used different hops and extracts that the Mr. Beer recipe called for.

Final Gravity Of 1.012 Held For 3 Days In A Row
 It's Sunday and time to take my final gravity readings and toss in my dry hops. The plan is to let the hops soak at the bottom of the fermentors for the next 5 days. I want to bottle and keg all 4 LBKs this coming weekend. I split 3 ounces of Cascade pellet hops between the 4 batches so there should be plenty of hop aroma when they're ready to drink.

Sanitized Sack And Stainless Steel Weights Ready To Go
I found that a single nut and lock washer were all that was needed to send the hops sacks to the bottom of the fermentors. Having the entire hop sack submerged under the beer will assure the beer has maximum contact with the hops adding maximum aroma in the process.

All Four LBKs Will Get A 5 Day Dry Hop
The fermentors are safely tucked away in my fermentation chamber and kept at 71-72F for the next 5 days until I'm ready to bottle them. I don't think I am going to bother cold crashing these four batches because I'm getting anxious to get them into my pipeline as soon as possible.

Priming Sugar Solution And Beer Go Into Bottling Bucket
The Cascade hops had a good 5-6 day soak in the primary fermentors and next I transferred the beer to my bottling bucket. I boiled some filtered water and stirred in 5 tablespoons of pure cane sugar to make up the priming solution.

I was able to fill both 2.5 gallon corny kegs with my Ptarmigedon ale and drinking on tap in about 3 weeks. It has a nice hoppy character that's citrusy but not overpowering. This one tastes so much better than the Proud Papa Pilsner recipe I brewed on the same day.

When I first started brewing using Mr. Beer extract only recipes I actually liked the Ptarmigan Pale Ale recipe enough to brew it a number of times. By adding steeping grains to the original recipe the head and lacing were a lot better and the addition of the Cascade finishing hops blended in nicely with whatever they put in the HME too. The Fermentis Safale US-05™ yeast produced a nice clean tasting ale, one that I will be brewing again.