Showing posts with label bottling. Show all posts

Thursday, August 6, 2015

The Art Of Cold Crashing Your Beer


The majority of home brewers that I've met over the years have never bothered to filter their beer before packaging it. The truth is most of the home brewed beers I try at club meetings and competitions are remarkably clear without ever having undergone any filtering at all. As an avid home brewer myself I stopped thinking about filtering my beer a long time ago. Like so many other home brewers did before me I discovered that really clear beer could be packaged by just following a few easy steps.

Enjoy Your Beer Cold, Clear And Colorful
What Is Cold Crashing?

I'm not really sure how the term 'cold crash' originally became part of the home brewing vocabulary though. I understand that the 'cold' part of the terminology refers to dropping the beer's temperature down to only a few degrees above freezing. I guess the 'crash' part of the terminology refers to having to do so as quickly as possible. The physics behind cold crashing is what causes the yeast, proteins and other solids that are otherwise suspended in your beer, to clump together, become heavier and eventually fall out of suspension. All those unwanted particles then sink to the bottom of the fermentor where they form a compact layer of trub leaving the beer above it clean and clear.

Never Worry About Chill Haze Or Floaties Again
Why Cold Crash Your Beer?

I cold crash all of the beer I brew to help give it a crisper, cleaner more colorful finish. Although chill haze isn't considered to be much of a problem when packaging some styles of wheat or darker colored beers, it can be an issue in lighter colored beer styles. While there is no adverse affect to beer flavor or taste due to the presence of chill haze in a glass of beer it is considered to be a flaw by most brewers. If left unchecked chill haze can cause 'floaties' to develop, clumps of yeast and protein matter that are bound together but are not heavy enough to ever settle out of your beer. Instead these clumps will just end up floating around inside your glass suspended in hazy beer for all to see.

Nobody Wants To See Floaties In Their Beer
When Is The Best Time?

Once my beer has reached it's final gravity signalling the end of fermentation, I start the cold crash cycle by lowering the temperature controller setting down to 40F. I do this to prevent the controller from initially undershooting the 40F temperature and unintentionally freezing the beer. The next day I drop the temperature down to 34F and let the beer sit there for up to a week before kegging it while it's cold. Force carbonating beer while it's cold is very efficient because Co2 dissolves much easier in a cold liquid.

Another benefit of force carbonating refrigerated beer is that the beer inside the kegs will continue to cold crash as it's being carbonated. This additional time that the beer spends held near 34F allows any remaining yeast, proteins or other solids to sink to the bottom of the keg. Only the smallest amount of debris should settle to the bottom of the keg at this step. The goal now is to serve clean pours so you don't want to be sucking up any trub into your first few beers.

Force Carbonate The Beer Cold, Clean And Quickly

After the moving the clean beer from the fermentors to the kegs you should now see a compact layer of trub stuck to the bottom of the fermentor. The trub layer acts as a trap that holds coagulated yeast, hop and protein debris inside the fermentor preventing any of the debris from getting into your kegs. If the debris were allowed to mix in with the beer again on its way to filling the kegs it may be impossible to prevent chill haze from forming in your finished beer. The debris also contains astringent tannins and other material that in significant enough amounts will contribute to the development of off flavors in the beer.

The Trub Layer Can Keep Debris From Entering The Finished Beer

Depending on how often you get to brew it can take several years to perfect every step in your brewing process. From grain and yeast selection to mash temperature to boil length and volume it's easy to see how a brewing process is made up of many different steps. With the goal in mind to brew the clearest cleanest tasting beer possible there are a few other tricks to keep in mind in addition to cold crashing your beer.

Tips For Producing The Clearest Beer
  • Adding WhirlFloc or other fining agents to the boil kettle just before flameout will help the proteins, tannins and hop particles to clump together while the wort is still boiling. 
  • Putting hop additions into fine mesh hop bags is also a good way to reduce trub in the kettle during the boil.
  • Using a whirlpool to compact the kettle trub so it doesn't get pulled along into the fermentor where it takes up room. 
  •  Waiting 20 or so minutes for any kettle trub to fall to the bottom of the kettle before moving the clean beer above it to the fermentors. Once the whirlpooling has stopped it can take that long for the smallest trub particles to settle out of the wort into a neat pile on the bottom of the kettle. 
  • Compensating for fermentation trub loss by transferring an additional quart of wort per five gallons of packaged beer to the fermentor reduces the chance of trub getting into the packaged beer.  

Whirlpool, WhirlFloc And Let Settle Before Transferring The Beer
  • Cold crashing the fermented beer before packaging it gives the yeast and other debris time to drop out of suspension and settle to the bottom of the fermentor. Depending on the flocculation rate of the yeast used to ferment your beer it can take anywhere from a few days to a few weeks for the yeast to settle out.
  • Carbonating your beer while it's still cold allows the cold crash process to continue as the beer is being carbonated. Since Co2 is more easily absorbed by cold liquids your beer will also carbonate faster than if it were carbonated warm.

Clearing Your Beer With Gelatin

After taking as much care as possible to remove yeast and trub from your beer there may be times when adding gelatin to the beer can help to speed things up. Since gelatin is made from animal parts, if you are gluten intolerant, or suffer from the symptoms of Celiac Disease, you definitely have no reason to worry when using gelatin to fine your beer.


1 Teaspoon Of Unflavored Gelatin In 1 Cup Of Water

I use Knox brand gelatin because it is easy to find at stores in my area and it is inexpensive to buy and use. Each box of gelatin contains 4 envelopes and each envelope contains 2 teaspoons of gelatin. A teaspoon of gelatin mixed with 1 cup of water and heated to 150F is enough to clear 5 gallons of beer. All that is needed to prepare the gelatin for use is a microwave safe measuring cup, a measuring spoon, a thermometer and a way to heat the mixture of gelatin and water to 150F.

Before adding gelatin to the beer I like to keg and carbonate it cold for a few days. The colder the beer is when the gelatin is added the more chill haze will be present for the gelatin to work on and the better the job it will do clearing the beer up. 


   1. Start by filling the measuring cup with 1 cup of water and then sprinkling 1 teaspoon of gelatin powder over the top of the water.

   2. I like to wait a few minutes for the gelatin to bloom before stirring it thoroughly into the water.

The Gelatin Will Bloom After Sitting A Few Minutes On The Water

   3. Heat the mixture in a microwave oven using short 15 to 20 second bursts, stirring it in between bursts, until the temperature of the gelatin mixture reaches 150F. It is not recommended to heat the mixture above 170F when preparing gelatin for fining beer.


Pour The 150F Gelatin Mixture Directly Into The Cold Beer

   4. Once the gelatin has been poured into the beer snap the keg lid back on and then purge the keg with Co2 to eliminate any oxygen from the keg. Keeping the kegged beer cold and undisturbed should clear the beer up in a matter of days.

Depending on the amount of of trub that will eventually settle out of the beer to the bottom of the keg, the first pour or two may be cloudy with gelatin and trub. At 36F the beer should clear in as little as 48 hours. I usually have time to wait for the beer to clear on it's own and only cold crash my beer. But when pressed for time using gelatin to quickly clear the beer of yeast and chill haze is a good option to have available too.  


In Conclusion

Every time I transfer wort or beer from one vessel to another I see it as an opportunity to reduce the amount of trub it contains and a way to further clean up the finished beer. Preventing chill haze and floaties from ruining the appearance of an otherwise perfect glass of beer is just one of the benefits of removing trub as you go. When using a plate or counter-flow chiller to cool your wort its also a good idea to keep their insides as clean as possible in order to prevent clogging and ensure a more effective sanitization.

Knowing your brewing system is also very important when it comes to calculating your wort and beer volumes. How much extra wort is needed in the kettle to allow for boil off, hop absorption and kettle trub loss? How much extra wort should you transfer to the fermenter to allow for fermentation trub loss? After spending time brewing a batch of beer the last thing you want is to come up short on the amount of beer you'll have to package. The crush of your grains, the chemistry of your brewing water and other things influence the clarity of your beer and make great topics for another day. Based on the information presented here today and a little effort you too will master the art of cold crashing your beer. 

Friday, July 10, 2015

Using The Blichmann BeerGun™

This month I share my very first experience using the Blichmann BeerGun™ to fill up some 12 ounce bottles. Previously in last month's update I documented how I connected the BeerGun™ to my existing kegging system. Since getting the beer gun connected I was able to brew a batch of my Orange Sunshine Belgian Witbier and put it on tap. This beer tasted so good and I enjoyed drinking it so much that I decided to bottle it up and take it with me on vacation. So with ten gallons of this delicious tasting beer force carbonated and ready to drink all I had to do was sanitize some bottles, hook the beer gun up and fill them up for the trip. 

I started to appreciate the benefits of filling bottles with carbonated beer right away. Having the same level of carbonation in your bottled beer as you have in your draft beer is definitely a huge plus. For one thing you no longer have to wait weeks for natural carbonation to occur then hope the beer had carbonated the way you planned. Bottling beer cold right from the same keg you've been pouring your drafts from eliminates any inconsistencies in carbonation levels. Another added bonus is not having to worry about the trub produced from priming sugar clouding up the beer. This becomes even more important when transporting or shipping bottles as they lay on their side getting jostled around.

Blichmann Beer Gun All Ready To Fill Some Bottles

Getting A Handle On The Handle

The first time I used the BeerGun™ to fill bottles it took me a little while to figure out the best way to maneuver it around the brew room. At first I wasn't used to working with something that trailed beer and Co2 lines behind it wherever it went. It didn't take long before I learned how to grip the gun comfortably enough to try and fill a few bottles. Soon after filling those first bottles it was easy to remember how the gun worked. Pressing the small button valve released Co2 from the tip of the beer gun into the bottle to purge it of oxygen. The flat handled valve when pulled back slowly released cold carbonated beer from the tip of the gun filling the bottles from the bottom up.
 
The steps required to fill the bottles were simple enough. Stick the beer gun barrel into the bottle until the tip touches the bottom of the bottle. Press the button valve for a few seconds to release Co2 inside the bottle to purge any oxygen from the bottle. Pull the flat handle valve to release cold beer into the bottle filling it up from the bottom to the top. With the bottle filled with beer remove the gun from the bottle and then place the tip of the gun even with the top of the bottle. Press the Co2 button valve and release it to replace any oxygen in the neck of the bottle with Co2. Lay a bottle cap on top of the bottle loosely to prevent anything from falling inside and to hold the Co2 in place until you're ready to cap the bottle.

Co2 Connections Go To Beer Gun And Keg

Get Organized And Keep It Cool

I found it much easier to move the gun and tubing around from place to place when both the gas and beer lines were neatly twist tied together. In this way the two lines acted like a single line with both bending and flexing together at the same time. Doing this kept the lines from twisting and kinking and putting a lot of unwanted strain on the gun itself. When filling six or more bottles at a time having as little resistance as possible on the gun makes the job of filling bottles much easier to do.    

When filling the bottles I recommend putting the bottles in a container deep enough to hold any beer that is sure to be spilled. I didn't use one and had to hose down the unpainted brewroom floor once I was done bottling, that's probably not something you will want to do inside your home though. Another thing I did was to setup my filling station so that the beer in the kegs would stay cold inside the refrigerator the entire time the bottles were being filled. The beer and gas lines sneak out through the small opening left between the refrigerator and the door's gasket. Filling chilled bottles with nice cold beer is the best way to reduce or eliminate foaming when bottling.

Cold Carbonated Beer In The Refrigerator And Beer Gun Ready To Go
I came up with a brilliant idea for chilling down bottles after they have been sanitized without having to put them inside a freezer. A large cooler holds about 30 twelve ounce bottles standing up with bottle caps loosely covering their tops. With the bottles covered so nothing falls inside them I carefully laid mats of frozen ice packs on top of the bottle caps and closed the cooler lid. By the time I finished sanitizing the beer gun and connecting the Co2 and beer lines the bottles had all been chilled down nice and cold and were ready for filling. I found that filling the cold bottles with the inside of the bottles still slightly wet with sanitizer helped to reduce foaming even more. 

Sanitized Bottles With Loose Bottle Caps On Top
The cold ice packs placed on top of the bottle caps does a great job of cooling down the bottles in preparation for filling. When filling them I was surprised to see that many of the bottle caps had sealed tightly to the tops of the bottles creating a slight vacuum that could be felt when lifting the caps off. It's always important to maintain good sanitization practices during the filling process especially if you plan on storing your bottled beer for several months before drinking it.

Reusable Ice Packs Are A Good Way To Chill Bottles

Settle In And Get Comfortable

I like to fill my bottles while I'm sitting in a chair and the bottles, caps and capper are on the floor next to me. This way I can reach into the cooler and get six or so bottles ready to fill and then cap them without having to get up. Once you get yourself organized the plan should be to rip through the filling process as quickly as possible. Even when using a beer gun the process of bottling beer is not exactly in my top five list of fun things to do.

Getting Comfortably Setup And Organized Saves Time
For my setup I turned the Co2 gauge down to read between 3-4 pounds of pressure. I found that setting worked the best to push the beer into the bottles without foaming while providing enough force to purge the bottles of air before and after filling them. I first inserted the barrel of the gun down to the bottom of the bottle and pressed the Co2 button for a few seconds to replace any room air in the bottle with Co2. Doing this will help to preserve the beer and prevent it from oxidizing while stored in the bottle.

Purge Room Air From Bottle With Co2 Before Adding Beer

Filling The Bottles With Beer

With everything needed for bottling laid out and within easy reach it didn't take long for the process to develop a nice rhythm. Remove the cap then purge the air, fill with beer then purge the air, replace the cap then do the next, then cap, then cap, then cap... In between all the filling and purging eventually you'll need to put the beer gun down for a while to use both hands for something. Having a bottle or container that's filled with StarSan and sturdy enough to hold the gun without tipping over comes in handy. I also kept a small dump container nearby to use when emptying beer from the gun or bottles if needed.

In Between Fills Put Your Gun In A Holster That Won't Tip Over
The barrel diameter of the beer gun is designed so it will leave just the right amount of headspace above the beer once the bottle has been filled and the gun removed. By placing the tip of the barrel just above the top of the bottle and giving the Co2 valve a short squeeze any air in the headspace will be replaced with Co2. This extra step is recommended especially if you plan to store your bottled beer for an extended period of time. After only a few tries the task of purging room air from the headspace in the bottles became intuitive and very easy to do.

Purge Room Air From Headspace With Co2 Before Capping
Simple Care And Maintenance

Soon after a bottle filling session it's important to clean out the beer line and gun in order to keep it working like new. Cleaning the gun and line is no different than cleaning out your beer tap and serving lines. A corny keg connected to a Co2 gauge and filled with a half gallon of StarSan works perfectly to flush any beer out of the gun. After pushing about a quart of StarSan solution through the beer line and gun replace the StarSan in the keg with clean warm water and repeat the process.  

One brewer I know reported having an issue with the little rubber stopper on the end of the beer gun. He claimed the rubber stopper on his gun became soft and sticky after an extended time sitting in StarSan. For that one reason alone I prefer to give the gun and lines a good rinse with clean warm water after running StarSan through them. Another brewer claimed the rubber stopper on his gun came off and landed inside the bottle he was filling. Once that happened the only way to stop the beer from flowing was to disconnect the beer line from the keg.

After filling about 60 bottles I haven't had either of those things happen to me. Fortunately replacement parts for the Blichmann BeerGun™ are readily available in case you need to order additional parts at any time. The replacement tip can currently be ordered from the Adventures In Homebrewing website for less than $3.00 USD. You can also order Blichmann BeerGun™ replacement parts from any of their many authorized dealers.


It's All Good

It's been nearly a week now since I returned home from vacation where the real test of the beer I bottled took place. Out of the 30 bottles I took with me only three of them found their way back home. The rest of the beers were shared with some of my beer loving family members who really liked it a lot. The Orange Sunshine Belgian Witbier is a nice refreshing session beer that's just perfect on hot summer days and warm summer nights. More than that each beer was evenly carbonated and very clean tasting right out of the cooler even after a 110 mile drive down the Garden State Parkway.

Looking back I have nothing but fond memories of a vacation shared with family, filled with good food and plenty of great tasting beer. For me nothing could have been more rewarding than to have tested out a new bottling method and knowing it passed with flying colors. Going by the results of a long holiday weekend get away I have every reason to think bottling beer for long term storage will prove to be just as successful as this short run. In fact I have ten gallons of my Hiphopapocalypse IPA that's nearly ready for packaging and plan on using my Blichmann BeerGun™ again soon.

Friday, August 10, 2012

Easy DIY Ale Pale Modification

Recently my short lived love affair with the autosiphon came to an abrupt end once I discovered valves. Sounds crazy right, well read on and I will explain to you exactly what I mean. The very fist 6.5 gallon plastic Ale Pail I bought was to be used as a fermentor and it had no 1 inch hole drilled in it for a valve, so I bought an auto siphon too in order to get the beer out of it. I soon found the longer auto siphon and tubing was a pain to use and a bit too challenging to clean, sanitize and store for my liking.

Stock 6.5 Gallon Ale Pail Fermentor
  The next Ale Pail I bought to use as a bottling bucket came with a 1 inch hole drilled in it about 2 inches off the bottom for a valve that I attached my bottling wand to. The only issue I had with this was how high up the bucket wall the center of the hole was, this was done so that the bucket could sit flat on the floor without the valve getting in the way. But I had noticed earlier that the valves are built to swivel without leaking, from the vertical to the horizontal position, and they could possibly be mounted an inch lower on the bucket wall without hitting the floor.

Using Auto Siphon To Fill Bottling Bucket
 Then one day it hit me! Just switch things around a little to use the bottling bucket as the fermentor since it's valve was already mounted high enough off the bottom to keep the trub from getting into the bottling bucket. Say goodbye to the long auto siphon, now I simply connect a much shorter length of tubing directly to the valve to fill the bottling bucket and a whole lot faster too. Now that the 'bottling bucket' is used as a fermentor I had the opportunity to improve the bottling bucket too. One big pain point I had with the Ale Pails delivered, with the valve hole pre-drilled, was when using them as a bottling bucket I had to stick a wedge under one end to get all the beer out of it because the valves were mounted too high off the bottom.

1 Inch Spade Bit Drill And Valve Assembly
 Take it from me this is going to be the easiest DIY project you're probably ever going to take on that returns such a huge benefit on bottling day. I marked the side of the fermentor with a sharpie aligning the center of the hole perpendicular to the handle and 1 1/8 inches from the very bottom. This allows enough room inside the bucket to spin the lock nut which in turns compresses the gaskets on the valve stem so there aren't any leaks. Once you've marked the location of the hole lay the bucket on it's side, put the 1 inch spade bit in a variable speed drill and drill the hole.


Drilling A 1 Inch Hole Using A Spade Bit

Needless to say it doesn't take much pressure, or a very high drill speed, to drill a hole through the soft plastic fermentor wall so go slowly. As the fine point of the bit goes through the wall you'll start to see marks in the plastic from the shoulders of the bit, this is where you want to keep the bit aligned so it begins to cut a nice even circle all the was around the center of the bit.

1 Inch Hole Drilled In Wall Of Ale Pail 1 1/8 Inch From Bottom
It only took about ten seconds using moderate pressure and drill speed to plunge the bit though the side of the fermentor. I used my fingers to pick and pull off any bits of stringy plastic left on the bucket before lightly sanding any sharp edges with a small piece of fine sandpaper. I did this to keep the hole as clean as possible  before attaching the valve to the bucket.

1 Inch Hole Before Cleaning And Attaching Valve
Once the hole has been drilled and cleaned up its time to install the valve assembly. This will require a little bit of effort because the hole is just tight enough that the valve stem has to be threaded into the side of the bucket. Make sure the outside gasket has been slid onto the valve stem then using firm pressure begin to screw the stem into the hole while keeping it straight and level. Once the outside gasket on near the valve body is touching the wall of the fermentor its time to reach inside the bucket and slip the inside gasket on the stem and screw on the inside nut.

Valve Body With Gasket Screws Into The Hole
Let the valve spigot hang over the end of a flat surface to allow room to turn the assembly without hitting anything. Mounting the valve this low on the fermentor means you'll have to swivel the spigot horizontally when storing it away. It also means that you'll be able to fill your bottles with practically every last drop of beer without having to tilt the bucket to one side so it can flow out of the valve. It is just high enough though to keep those little bits of trub that somehow made it into the bottling bucket from getting into your bottles.

Bottling Bucket Shown On Left Fermentor Shown At Right
I unscrew the valves from the fermentors when cleaning them after transferring the beer to the bottling bucket, sometimes I find a little bit of trub buildup inside the valve body or accumulating around the inside gasket. It only takes me a few extra minutes to make sure the entire assembly has been thoroughly cleaned and sanitized before each use. I really don't mind taking the extra time to make sure I get a good clean fermentation. 

Transferring And Aerating Cooled Wort To Fermentor
Using valves and tubing to transfer beer is a whole lot easier and a lot faster than transferring beer using a racking cane or an auto siphon. After making this simple DIY modification to two of my Ale Pales I wouldn't dream of going back to the way I used to transfer my beer. So far I've been relying on gravity to keep my beer moving but I'm already beginning to see the benefits adding a March pump would make to my brewing process. I'm happy with the valve and tubing upgrades made to my kettle, fermentors and bottling buckets. I really couldn't have imagined what a huge difference they would make to my brewing process if I hadn't actually gone ahead and made the changes.  

Twist The Valve Handle And Let Gravity Do The Rest

Thursday, October 14, 2010

Weizen/Weissbier- Carbonation

 It's been 6 days since I bottled the 8 1 litre PET bottles with the Weissbier recipe I brewed last month. The bottles have been sitting in my basement at 65-70F and they are getting pretty hard to squeeze already. Holding them up to the light they look light and cloudy, which is a good thing for a wheat beer. There was a layer of pellicle floating on top of the beer before I bottled it, pellicle is ofter associated with an infection.

Inside Of Mr. Beer Keg After Bottling Wiessbier

 You see the reason I mention this is that 1). I've never brewed a wheat beer using Muntons Wheat DME before and 2). I've never seen such a pronounced layer of pellicle floating on top of the beer just before bottling and 3). I've never seen a wheat beer with such bright yellow color and subtle hint of lemon flavor before. Although it looked like the residual carbonation was lower than the stout I brewed during the same time and it was cloudy which is good in a wheat beer.

Weizen/Weissbier Sample At Bottling

The pellicle covers the top of the green beer while it's inside the fermenter and prevents oxygen from reaching the yeast. Pellicle is formed by yeast that is normally not used to ferment our beer, this yeast type competes with the good yeast and can our beer to sour, or worse become undrinkable. I've done a bit of research and some information that's out there says it can introduce a sour taste that is desired in beer styles like a Lambic.

Pellicle Floating On Top Of Weizen/Weissbier

 My confusion is that the pellicle was extremely thin and feathery, practically melting away to nothing as the keg was emptied. Information that I researched was hard to find but mostly talked about string like growths or chunks found floating on top of the fermenting beer. These almost always led to really bad tasting sour beer that sometimes improved with ageor sometime just ended up tasting like vinegar.

Saturday, August 14, 2010

Bottle Day - 6 Batches In Under 7 Hours

  This weekend I was able to bottle up 6 separate Mr. Beer recipes in just under 7 hours, including kitchen cleanup! This makes 27 two gallon batches bottled to date, starting in February 2010. I picked all lighter colored pale ales and a wheat beer recipe to brew last month since it's been so hot here on the east coast. This time I also used my new carbonation calculator to determine the correct amounts of priming sugar to use in each different style of beer. I no longer followed the default priming sugar amount recommended by Mr. Beer's instructions.

 I bottled up 2 gallons each of the following recipes:


Office desktop space doubles as a 6 keg fermenting station

 I bottle my beer in 1 litre PET bottles that I first sanitized using One-Step™ sanitizing cleanser that came with my Mr. Beer premium home brewing kit and stirred in a packet of sanitizer into a pot holding 2 gallons of warm water. Then using a small funnel and a plastic cup I filled each of the 54 PET bottles about halfway with the sanitizing solution, give them all a few really good shakes and lat them soak lying down for at least 10 minutes.

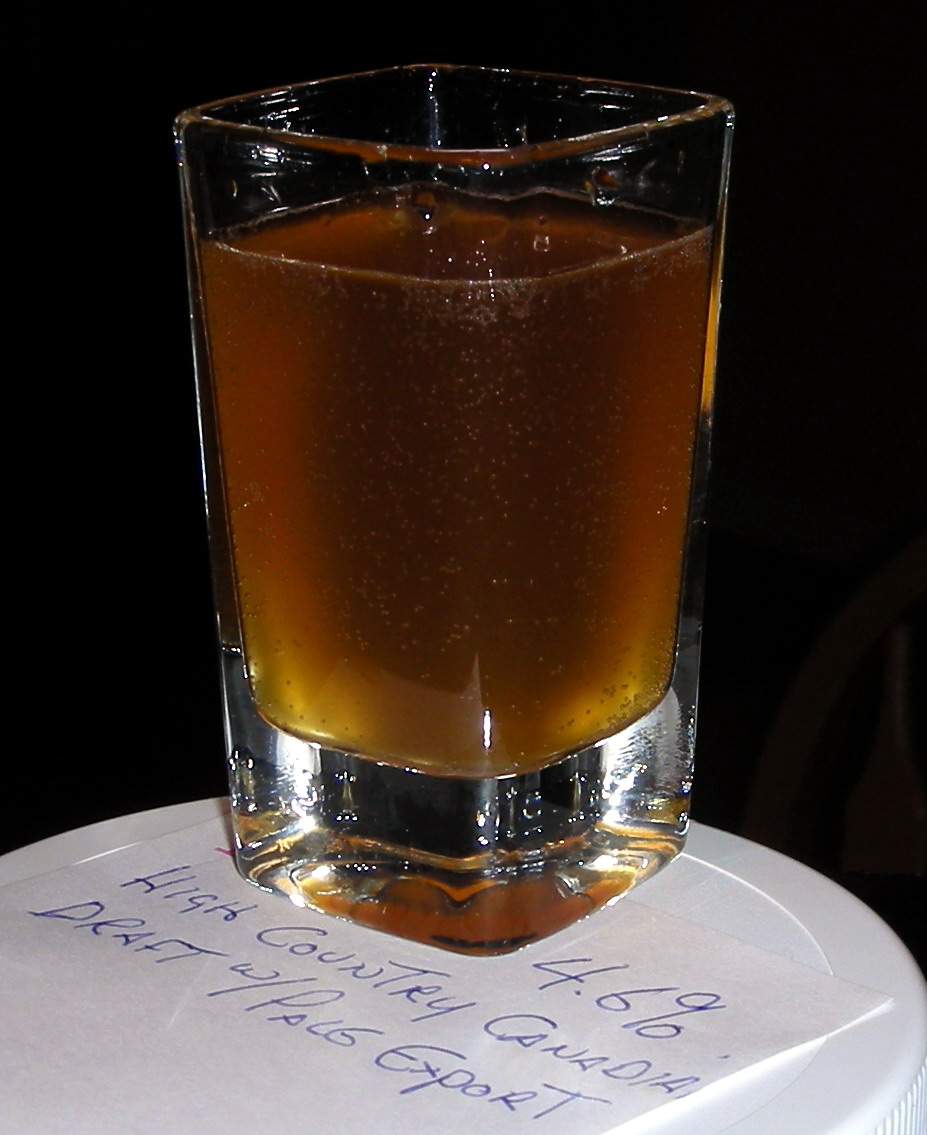
 While the bottles were soaking I poured a small sample of beer for tasting and visual inspection. Ideally after fermenting for 21 days at a constant 70F the beer at this point will taste like flat beer and not too sweet. This is a sign that most of the sugars in the green beer have been turned into alcohol and CO2 already and the beer is ready to bottle.

High Country Canadian Draft with Pale Export sample taken just prior to bottling.

 The sample above shows the clarity of the beer and proof of the residual CO2 present in the beer as indicated by the small bubbles on the sides of the sample glass. I targeted the finished beer's CO2 volume to be 2.5 volumes modeled after the CO2 volumes of an 'American Style Pale Ale' which is between 2.26 to 2.78 volumes.

 At 70 F the residual CO2 volume of the fermented beer calculated out to .83 volumes.To increase the volume to target of 2.5 volumes of CO2 I added 1.5 additional teaspoons of pure cane sugar to each 1 litre PET bottle as shown by the calculator below.


 After pouring 1.5 teaspoons of cane sugar into each bottle and filling them with fermented beer, I turn each bottle 'end over end' several times to mix the sugar and beer together. This is done to make sure the sugar is evenly distributed throughout the beer before screwing on the bottle caps and beginning the carbonation process.

 Pet bottle after mixing the priming sugar into the fermented beer.

Over the next 21 days the yeast will convert the priming sugar to CO2 and alcohol to produce just the right amount of carbonation for the style of beer bottled. I carbonate my beer at a constant 70F and usually give them a squeeze once a day to see how the carbonation is progressing. Not much happens carbonation wise for the first 1 to 3 days but the bottles will become slightly harder to squeeze each day. 


Friday, June 4, 2010

Fermenting And Carbonating

These 4 recipes have been fermenting at 70F since May 22, 2010 and have only 1 more week to go before I bottle them up. During the fermentation process the kegs are left undisturbed for 21 days. I screw the lids on tight after filling the kegs with wort on brew day and I won't unscrew them again until they've been emptied on bottling day.

I keep the kegs tilted on a slight angle by slipping empty CD cases under the spigot end of the kegs. This guides the settling trub away from the spigot and helps to keep the beer clear when bottling.

I use the optional locking spigots and bottom filler tubes, they really make a difference when doing a lot of bottling as I often do.


I also have 4 recipes carbonating at a constant 70F and they have 1 week to go before placing them downstairs to condition at 60-65F for at least 3 weeks.